Alright so I only paid like $2 for each at Goodwill but it still makes me giggle a bit. Making soakers and longies has become my new obsession. The wool is a great cover because it is breathable, naturally antibacterial, and hold something like 40 times is weight in liquid. I started using wool at night a few months ago and love it- we haven't had a leak yet. His pants are dry in the morning even if his diaper is soaked. And the really nice thing (with it being a hot, hot South Carolina summer) is that it breathes so the heat of his body isn't trapped in the PUL with his pee. Gross, I know, but when I used to change his diapers with PUL covers, the wet diaper would be hot to the touch. Now, with the wool, it is cool.
Making the soakers and longies is super easy- I've never sewn before and I do each one by hand (hint hint to husband- I would love a sewing machine). A pair of longies usually takes about one nap (1-2 hours)and a soaker usually takes about 2-3 naps (3-6 hours). Here are the steps:
1- I find a cheap wool sweater from Goodwill. Cut off the arms and felt it if you like. Felting (nice way of saying shrinking the sweater) will make the wool fibers closer together so the longies or soaker will be thicker and more bulletproof but it will stretch less. I felted the first few sweaters but I found it to be kind of a pain so I won't do it anymore.
1a-To felt you stick the sweater in the washing machine on hot and do a wash or two.
1b- Throw the sweater in the dryer.
1c- This is the part I hate and will not do again. Wash all the annoying lint out of the washer.
1d- Pick all the annoying lint balls off of your now clean and shrunken sweaters.
1e- Clean the annoying lint out of your dryer.
1f- Clean all the annoying lint off of your floor.
1g- Take the trash out because the annoying lint is now overflowing out of the laundry room trash.
2- To make the longies just sew the arms together. What?! Okay here's a really good tutorial. One thing I have noticed though that this tutorial doesn't really show is that you need to cut a little width off the top of the arms. This picture kind of shows what I mean by that.
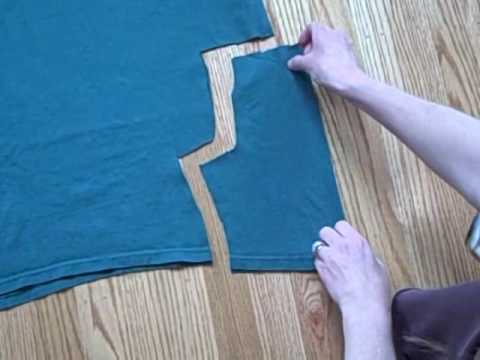
See the little curve at the top- you need to cut just a bit out of the arms to make the pants fit a bit better because otherwise the butt will be pretty baggy and the legs a little more tight and it looks a little sloppy. The hardest part is probably adding the waist. I usually use elastic and save the waistband of the sweater for the waistband of the soakers (see below). I just grab some elastic and cut it to the desired length (use a little less elastic than is in the waist of the pants you are modeling after to make the pants- somehow when you sew it in, if you use the exact size you think you need it will always be too big). Fold the top of the wool pants over and sew a pocket for the elastic that is a little bigger than the width of the elastic. Sew almost all the way but leave enough room for you to thread your elastic through. Then thread your elastic through. Sew the ends of the elastic together and then finish up the pant. Hooray!
3- I use the rest of the sweater to make soakers. I use the Katrina pattern for soakers and I LOVE it. They come out looking so professional (If I do say so myself). It seems a little daunting at first but honestly you just trace the pattern onto your sweater, cut it out, sew up the sides and then sew on the waist and legs. I usually use the waist of the sweater for the waistband of the soakers. I then use scraps for the legs. For one of the pairs today I found a long scrap and then just folded it in half lengthwise so that the bottom edge wasn't all frayed and loose. You could always just hem the edge though if you didn't want your legs to be so thick.
4- T0 make them ready for use, you still need to lanolize them. Lanolizing the wool will make it waterproof so that it won't wick moisture. There are many ways to lanolize. Here is what I do.
4a-Fill a sink with cool water.
4b- Add a bit of wool wash.
4c- Throw in your beautiful soakers and longies and wash, wash, wash.
4d- Soak for about 1/2 hour.
4e- Empty the sink.
4f- Gently wring out some of the water in the wool.
4g- Refill the sink with cool water.
4h-In a baby food jar or some small jar put a nickel size amount of lanolin. I use the same stuff I use for breastfeeding, just make sure it is 100% lanolin (it's the one in the purple tube- Lansinoh I think). Add to that a nickel size amount of baby wash. This helps break up the lanolin and will keep away the dreaded lanolin spots. Fill the rest of the jar with hot water. Shake shake shake until you don't see any more lanolin.
4i- Throw your lanolin mixture into the sink.
4j- Mix it around.
4k- Throw in your beautiful soakers and longies and mix, mix, mix.
4l- Soak for at least a 1/2 hour but I usually forget and leave it overnight.
4m- Empty the sink.
4n- Gently wring out some of the water in the wool.
4o- (whoa I am getting up there in the steps of this tutorial!) Lay the wool on a towel and then roll up the towel and sit on it to get out as much water as possible.
4p- Let the wool dry- it usually takes about a day and a half.
5- Use the wool. When the wool gets damp, simply hang or lay it out to dry. Wash the wool in wool wash about every other week or when it starts to smell like urine when dry. You really only need to relanolize it once a month or less. You'll see when it starts to seem less waterproof.
Ta da!

I wish I had a better picture but here is the very first soaker I made for N.
No comments:
Post a Comment